MicroPython code that runs a fully functional Lego 3D Printer.
This is the code for my Lego 3D printer, as seen on my YouTube channel:
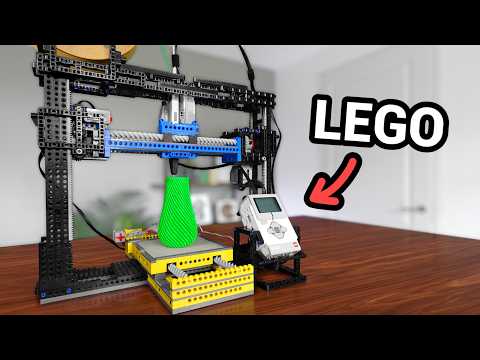
This is the MicroPython code for my LEGO 3D Printer, built using Pybricks for LEGO Mindstorms EV3. It processes G-code files to control the printer's movements and extrusion with a 3D pen.
As Pybricks is available for multiple other Lego robotics system, the printer.py file can easily be adapted to work with other systems.
If anyone would be willing to create a fork for different systems, that would be great!
📘 Building instructions are on Rebrickable: https://reb.li/m/221554
If you enjoy what I do and would like to support future creations, consider buying me a 🧱 Lego brick!
Every contribution helps fund new machines and videos on YouTube!
- Credits
- Features
- Requirements
- Getting Started (Installation & Setup)
- Usage
- Customization
- About The Machine
- License
- Contributing
- Disclaimer
This project relies solely on the Pybricks library and standard MicroPython features. No external assets are directly used within the code.
The project includes the following features that enable the 3D printing process:
- G-code Parsing: Interprets G0 (rapid move) and G1 (controlled move) commands from G-code files, extracting X, Y, Z and E coordinates. It handles G92 E commands for extruder calibration.
- Extruder Control: Manages the 3D printing pen's on/off state.
- Automated Homing: Uses touch sensors for automatic homing of all X, Y, and Z axes, for a consistent print origin.
- EV3 Display Interface: Provides an interactive interface on the EV3 screen for selecting G-code files, displaying print progress, and prompting user actions.
- Print Completion Sequence: Automatically moves the extruder to a safe position and displays a completion message after a print is finished.
- Manual Control Utility: A separate script (
manual.py) to manually move the X, Y, and Z axes, and trigger the extruder, for calibration, testing, or fine-tuning.
Before you begin, ensure you have the following:
-
LEGO Mindstorms EV3 Brick: The core controller for the printer.
-
microSD Card: Containing the operating system for Pybricks.
-
LEGO EV3 Motors:
- 3x Motors for the axes.
- 1x Motor for the extruder (e.g., to press a 3D pen button).
-
LEGO EV3 Touch Sensors:
- 3x Touch Sensor for axes homing.
-
A 3D Printing Pen: The actual "extruder" that deposits material.
Note on 3D Pens: Cheaper pens (under $30) often leak filament, causing messy prints. A slightly more expensive pen has shown much less leakage, leading to cleaner and better results. While not required, a better pen is recommended for print quality.
-
A Built LEGO 3D Printer Mechanism: As described in the About The Machine section.
-
Computer with Internet Access: For downloading firmware and transferring files.
-
USB Cable or Bluetooth: To connect your EV3 brick to your computer.
This section will guide you through setting up your EV3 brick with Pybricks and transferring the necessary code to run your LEGO 3D Printer.
The main.py code and accompanying modules are written in MicroPython using the Pybricks library. You need to flash the Pybricks firmware onto your EV3 brick first.
- Go to the official Pybricks documentation
- Follow the instructions to flash the firmware onto your EV3 brick.
- Follow the instructions to setup Visual Studio Code and the LEGO® MINDSTORMS® EV3 MicroPython Extension.
Open your terminal or command prompt and clone this GitHub repository:
git clone https://github.com/CreativeMindstorms/LEGO-3D-Printer.gitAlternatively, you can download the repository as a zip file using the Code button at the top of this page, after which you should unzip it.
This is where the Visual Studio Code Extension comes in handy.
- Open the Project in VS Code: In VS Code, go to
File > Open Folder...and select theLEGO-3D-Printerfolder you just cloned. - Connect your EV3: Connect your EV3 brick to your computer via USB or Bluetooth. Ensure the EV3 is turned on and Pybricks firmware is running.
- Connect in VS Code: In the VS Code Explorer, locate the "EV3DEV DEVICE BROWSER" in the bottom left corner when in the file selector. Open it and select your device. Once connected, the icon will turn green or indicate "Connected."
- Upload Files: With the EV3 connected, you can now transfer all the files by running the code. This will automatically upload
main.pyand any modules it imports (likegcode_handler.pyandprinter.py) to your brick.
The printer expects .gcode files in a subdirectory named models/.
-
Create G-code files: You'll likely need to "slice" your 3D models using a standard slicer (like Cura, PrusaSlicer, Slic3r).
Your slicer settings are crucial for successful prints. Here are some recommended settings and screenshots of how they might look:


Example Slicer Settings for the LEGO 3D Printer.These settings define the physical characteristics and movement of your printer.
- Layer Height:
- Recommended:
0.6 mmto0.8 mm - Why? 3D pens often extrude more plastic than actual 3D printers.
- Recommended:
- Line Width:
- Recommended:
1.0 mmto1.4 mm - Why? Matches typical 3D pen extrusion widths.
- Recommended:
- Support: Use as little as you can, as they are more difficult to remove from 3D pen creations.
- Layer Height:
-
Upload G-code files: Place your
.gcodefiles inside themodels/directory.- Important Note on G-code: This firmware is simplified and expects specific G-code characteristics:
- Simplified Commands: Only
G0(rapid move),G1(controlled move), andG92 E(set extruder position) are parsed. Other common G-code commands (e.g.,M104,M109,M82,M84,M92etc.) are ignored. - Absolute Extrusion (M82): The
GCodeProcessorassumes your G-code uses absolute extrusion distances. Ensure your slicer is configured to outputM82or that your E values are always absolute.
- Simplified Commands: Only
- Important Note on G-code: This firmware is simplified and expects specific G-code characteristics:
- Ensure your EV3 brick is fully charged.
- Turn on your EV3 brick.
- Ensure all motors and sensors are connected to the correct ports as specified in the About The Machine section.
Once the code is transferred and your EV3 is set up, running the printer is straightforward.
-
Run
main.py:- On your EV3 brick, navigate to the
main.pyfile (under "File Browser"). - Select
main.pyand press the center button to run it.
- On your EV3 brick, navigate to the
-
File Selection:
- The EV3 screen will display "Select file:" and list the G-code files found in your
models/directory. - Use the LEFT and RIGHT buttons on the EV3 brick to scroll through the available
.gcodefiles. - Press the CENTER button to select the desired file.
- The EV3 screen will display "Select file:" and list the G-code files found in your
-
Prime Extruder Prompt:
- After selecting a file, the screen will ask "Is the pen ready?".
- Press the RIGHT button to prime: This will initiate a priming sequence. The extruder motor will briefly activate (to press the 3D pen button once) and then the printer will wait for a pre-defined
wait_time(default 35 seconds) to allow the 3D pen to heat up. A countdown will be displayed. - Press any other button (e.g., LEFT or UP) to skip priming: The printer will proceed directly to homing without waiting.
- To stop the priming countdown early: Press the CENTER button during the countdown.
-
Homing Sequence:
- The printer will automatically begin its homing sequence, moving each axis until it triggers its respective touch sensor. This calibrates the printer's zero position. The screen will display "Homing axes...".
-
Printing Progress:
- Once homed, the printer will start processing the G-code file.
- The EV3 screen will display "Printing..." and a percentage progress indicator (e.g., "50%").
- To stop a print at any time: Press the CENTER button on the EV3 brick. The printer will stop, and the screen will display "Stopped." You will need to press the center button again to exit the stopped state.
-
Print Complete:
- Upon completion of the G-code file, the screen will display "Print complete!" and a beep sound.
- The Z-axis will lift, and the Y-axis (print bed) will move forward to present the finished print.
- The screen will prompt "Press any button to exit." Press any button to return to the EV3 menu.
This script allows you to manually move the printer's axes and control the extruder, which is very useful for:
- Initial setup and physical alignment.
- Troubleshooting motor movements.
- Testing extruder functionality.
To use it:
- On your EV3 brick, navigate to
manual.pyfile (under "File Browser"). - Select
manual.pyand press the center button to run it. - The EV3 screen will show text indicating what is X and Y movement (UP/DOWN for Y, LEFT/RIGHT for X). Press the corresponding buttons to move.
- Press the CENTER button to switch to E (Extruder) and Z (Z-axis) control. The screen will update to show UP/DOWN for Z, LEFT/RIGHT for E.
- LEFT (E-): Activates the extruder (e.g., presses the 3D pen button).
- RIGHT (E+): Deactivates the extruder (e.g., releases the 3D pen button).
- Press the CENTER button again to switch back to X-Y mode.
- To exit
manual.py, press the BACK button on the EV3 brick.
You can customize various parameters within the main.py, gcode_handler.py, and especially printer.py files to match your specific LEGO printer's design and your 3D pen's characteristics.
Before modifying, ensure you understand the parameter's effect! Incorrect values can cause motors to crash or prevent successful printing.
VERBOSE: Controls the amount of debug information printed to the EV3 console.- Why customize? Increase for debugging issues, decrease for faster execution (though minimal impact) or cleaner console output.
models_subdir(Line 18): The name of the directory where your G-code files are stored.- Default:
'models' - Why customize? If you prefer a different folder name (e.g.,
'prints','my_designs').
- Default:
gcode_extension(Line 18): The file extension for your G-code files.- Default:
'.gcode' - Why customize? If your slicer outputs files with a different extension (e.g.,
'.nc','.txt').
- Default:
This file contains crucial parameters for your printer's physical operation.
| Variable | Description & Customization |
|---|---|
self.xy_speed |
Adjusts general movement speed for X and Y axes (in deg/s). |
self.z_speed |
Adjusts Z-axis movement speed (in deg/s). |
self.e_speed |
Adjusts extruder motor speed (in deg/s). |
self.max_xy_speed_multiplier |
Multiplier for rapid X/Y travel speed. |
self.x_mm_per_degree |
CRITICAL CALIBRATION! Millimeters moved per degree of X-motor rotation. |
self.y_mm_per_degree |
CRITICAL CALIBRATION! Millimeters moved per degree of Y-motor rotation. |
self.z_mm_per_degree |
CRITICAL CALIBRATION! Millimeters moved per degree of Z-motor rotation. |
self.y_limit |
Sets the maximum Y-axis travel limit in millimeters (used for print presentation). |
self.z_limit |
Sets the maximum Z-axis travel limit in millimeters (used for print presentation). |
acceleration_multiplier |
Fine-tunes motor acceleration for smoother motion. |
target_tolerance_multiplier |
Adjusts motor precision for target stops, affecting movement continuity. |
self.wait_time |
Sets the 3D pen's priming/heat-up time in seconds. |
self.font_size |
Changes the font size on the EV3 screen. |
| Motor Gear Ratios | CRITICAL CALIBRATION! You can define your specific gear ratios for x_motor, y_motor, and z_motor during their initialization (e.g., Motor(Port.A, gears=[input, output])). Adjust these in printer.py to match your physical build. refer to the documentation for how to do this. |
| Method Name | Parameter / Area to Change | Description & Customization |
|---|---|---|
_start_extruding() |
duty_limit parameter |
Controls motor power for reliable pen activation. Adjust for your pen's button force. |
wait() duration |
Fine-tune delay after pressing the pen button. | |
_stop_extruding() |
duty_limit parameter |
Controls motor power for reliable pen deactivation. |
home() |
Z_offset_up, X_offset, Y_offset, Z_offset_down |
CRITICAL CALIBRATION! These variables define the final "zero" print origin relative to the touch sensors. Adjust for precise print start location and first layer height. |
present_print() |
Z-axis lift distance | Change 10 (in 10 / self.z_mm_per_degree) to adjust how high the extruder lifts after printing. |
| X and Y axis target positions | Modify x_motor.run_target() and y_motor.run_target() calls to change where the print head moves after printing (e.g., to present the print). |
General Customization Workflow:
- Calibrate MM per Degree: This is the most important step for accuracy. Use a ruler and measure distances for known motor rotations.
- Adjust Homing Offsets: Set every position to 0 by default. Run
main.py, let it home, then carefully adjust the values one by one and check where the extruder ends up, testing everything. AdjustX_offset,Y_offset,Z_offset_up,Z_offset_downiteratively until the nozzle is at your desired X=0, Y=0, Z=0 location. - Test Extruder Actuation: Verify
duty_limitin_start_extruding()and_stop_extruding()for reliable pen operation. - Fine-tune Speeds: Adjust
xy_speed,z_speed,e_speedfor optimal printing speed and quality. - Test with Simple Prints: Start with very small, simple G-code files after each major calibration change.
The current code configuration assumes a specific setup for motors and sensors on the EV3 brick. It uses a single EV3 brick.
📘 Building instructions are on Rebrickable: https://reb.li/m/221554
EV3 Brick:
| PORT | DESCRIPTION |
|---|---|
| A | X-axis Motor: Controls movement along the X-axis (print head left/right). |
| B | Y-axis Motor: Controls movement along the Y-axis (print bed forward/backward). |
| C | Z-axis Motor: Controls movement along the Z-axis (print head up/down for layers). |
| D | Extruder Motor: Activates/deactivates the 3D printing pen. Assumes holding the button down to keep printing. |
| 1 | X-axis Touch Sensor: Used for homing the X-axis. |
| 2 | Y-axis Touch Sensor: Used for homing the Y-axis. |
| 3 | Z-axis Touch Sensor: Used for homing the Z-axis. |
Gears and Precision:
Gears are essential for controlling the printer's speed, torque, and precision.
They allow the motors to move the print head and bed smoothly and accurately, providing the necessary mechanical advantage.
The specific gear ratios used in your build directly impact the movement calculations in printer.py, so ensure your physical printer is correctly represented in the code.
This project is licensed under the GPLv3 License. Contributions and modifications are welcome, but they must remain open-source and credit the original author.
Contributions are welcome, and I appreciate your interest in improving this project! However, I want to keep this easy to manage, as it is a personal project and a learning experience for me.
If you’d like to suggest changes or improvements, here’s how you can contribute:
- Fork the Repository: Create a personal copy of the repository by clicking the "Fork" button at the top.
- Make Changes: Implement your changes in your forked repository. Please keep changes focused and well-documented.
- Submit a Pull Request (PR): Open a pull request with a clear explanation of your changes. Include why the change is beneficial and how it affects the project.
This project is a hobby, and while I enjoy working on it, I can’t provide consistent support or assistance. Please feel free to reach out via email for questions or feedback, but responses may be delayed depending on my availability.