![]()


Manage NGINX like a pro, without touching the terminal.
Simple, powerful, and production-ready NGINX management UI with Let's Encrypt integration.
- One-click reverse proxy setup
- Automatic Let's Encrypt certificate issuance & renewal (incl. DNS challenge)
- Integrated WAF with Anubis: Protect your applications with intelligent request filtering and attack mitigation.
- Anti-Crawling & Bot Protection: Block unwanted scrapers and abusive traffic with adaptive Anubis rules.
- Path Rewriting & Redirects: Fine-grained control over request rewriting and redirect rules.
- Static File Hosting: Easily expose folders with access control.
- CI/CD-friendly API to enable/disable upstream backends
- Logrotate configuration via UI
- Superuser/admin mode for advanced NGINX config
- Designed for managing multiple domains and teams
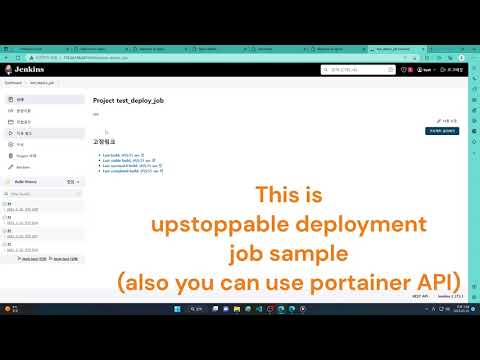
- Non-disruptive deployments using Jenkins or other CI/CD tools
- Built with full ES Modules (ESM) for modern, modular Node.js architecture
- Responsive, mobile-friendly UI that adapts to desktop, tablet, and phone layouts
- Lightweight and minimal UI stack: tailwind, daisyui etc. (no heavy frameworks)
- Instant config reload & validation - UI-triggered NGINX config test + reload
- certificate data persisted in Docker volumes, ready for production
- Easy setup with production-grade Docker-Compose
- NGINX Status Dashboard: Real-time stats including active OS-level connections.
- Dark Mode & Themes: Modern UI with theme switching support.
- Backend Health Check: Ping and verify backend server availability.
- Nginx access / error log display.
| UI Overview | Cert Management | Backend Server | Domain/URL |
|---|---|---|---|
 |
 |
 |
 |
-
Install & Load-Balancer Setup
-
CI/CD + Non-disruptive Deployment
-
Let's Encrypt Certificate Renewal
- Install Docker and Docker-Compose
- Create a docker-compose.yml file similar to this:
version: '3.7'
services:
  nginx-webui:
    image: lancard/nginx-webui
    container_name: nginx-webui
    environment:
      - TZ=Asia/Seoul
    ulimits:
      memlock:
        soft: -1
        hard: -1
    restart: always
    ports:
      - 80:80
      - 81:81
      - 443:443
    volumes:
      - nginx-webui-data:/data
      - nginx-webui-cert:/etc/letsencrypt
      - nginx-webui-log:/var/log/nginx
      - nginx-webui-logrotate-config:/etc/logrotate.d

volumes:
  nginx-webui-data:
  nginx-webui-cert:
  nginx-webui-log:
nginx-webui-logrotate-config:- Set environment variable if you need (it not set, nginx-webui will generate keys automatically and you can find keys in docker logs)
JWT_SECRET=abcdefgh
JWT_EXPIRES_IN=1h
TRUST_PROXY=1
Setting JWT_SECRET is beneficial in scenarios such as server reboots or when load balancing across multiple nginx-webui servers. To obtain the real IP address of the client, set the TRUST_PROXY environment variable. (Specify how many proxies are in front of the server.)
- Run docker-compose
docker-compose up -d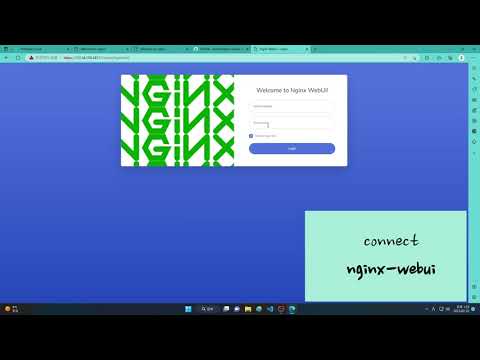
docker-compose logs # for check admin password- Log in to the Admin UI
The 'administrator' user password is randomly generated by first time. you can check it by 'docker-compose logs'
When your docker container is running, connect to it on port 81 for the admin interface.
(The connection is secured with a self-signed certificate. If you receive a security warning message, ignore it and continue)
Default Admin User:
id: administrator
password: (get it from docker-compose logs)
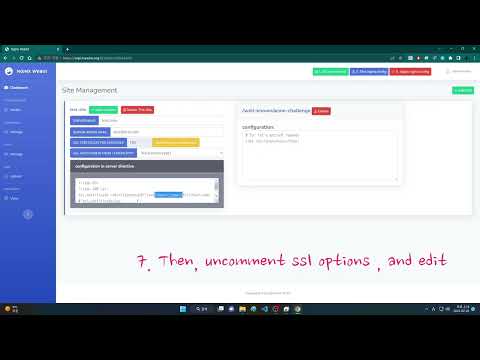
- Setup Config
Refer Screenshot 4
- Use API for CI/CD
curl --insecure -H "Authorization: Bearer ${token}" "https://localhost:81/api/upstream/${upstream-name}/${backend-address}/enable"
curl --insecure -H "Authorization: Bearer ${token}" "https://localhost:81/api/upstream/${upstream-name}/${backend-address}/disable"
cd /admin
npm run password
If you're upgrading from a previous version, please refer to the MIGRATION.md for detailed steps and compatibility notes.
- Create a volume and make id_rsa.pub file then attach the volume to /root/.ssh
- It will open ssh server automatically.
- change directory /root/nginx-webui/admin
- execute 'npm run watch'
- it will open 7777 port
- server side: npm, nodejs, express
- client side: daisyui, tailwind, esbuild, jquery, dayjs, chart.js
Feel free to make PR! Don't forget to give the project a star! Thank you!
- Fork the Project
- Create your Feature Branch (
git checkout -b feature/AmazingFeature) - Commit your Changes (
git commit -m 'Add some AmazingFeature') - Push to the Branch (
git push origin feature/AmazingFeature) - Open a Pull Request
For easy license management and legal dispute avoidance, the contributing codes are attributed to the author and all rights are attributed to the author. In addition, the MIT license is maintained. If you don't want it, please don't make PR.
MIT License