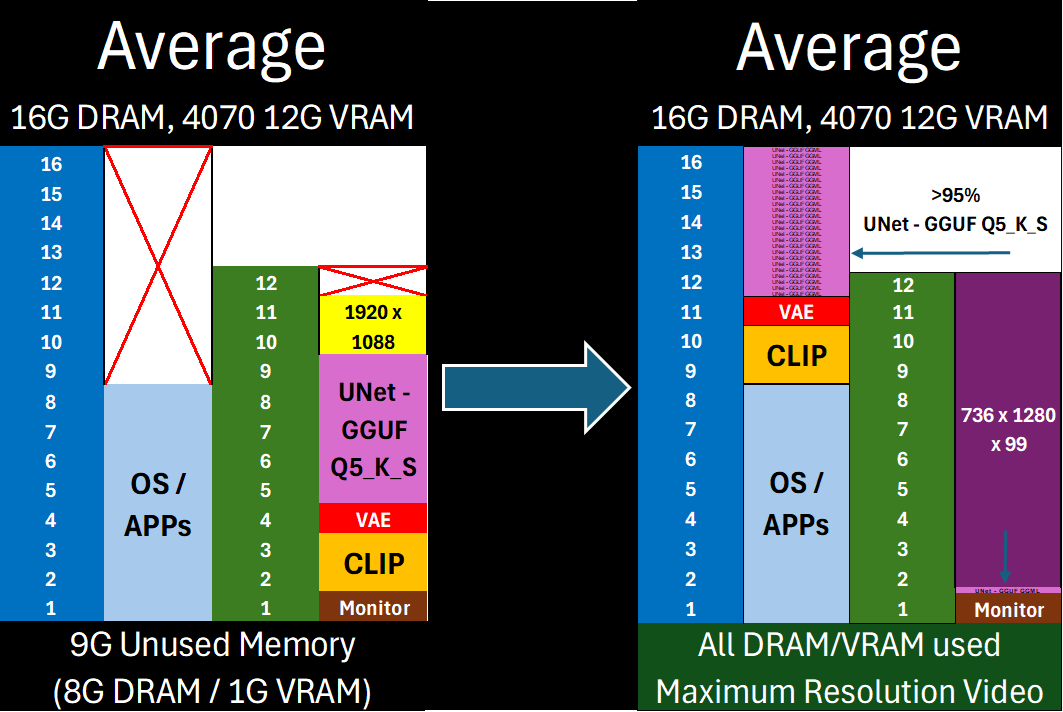
Free almost all of your GPU for what matters: Maximum latent space processing
- Universal .safetensors Support: Native DisTorch2 distribution for all
.safetensorsmodels. - Up to 10% Faster GGUF Inference versus DisTorch1: The new DisTorch2 logic provides potential speedups for GGUF models versus the DisTorch V1 method.
- Bespoke WanVideoWrapper Integration: Tightly integrated, stable support for WanVideoWrapper with eight bespoke MultiGPU nodes.
- New Model-Driven Allocation Options: Two new inutuitive model-driven Expert Modes to facilitate exact placement on all available devices - 'bytes' and 'ratio'
DisTorch 2.0 in Action
What is DisTorch? Standing for "distributed torch", the DisTorch nodes in this custom_node provide a way of moving the static parts of your main image generation model known as the UNet off your main compute card to somewhere slower, but one that is not taking up space that could be better used for longer videos or more concurrent images. By selecting one or more donor devices - main CPU DRAM or another cuda/xps device's VRAM - you can select how much of the model is loaded on that device instead of your main compute card. Just set how much VRAM you want to free up, and DisTorch handles the rest.
- Two Modes:
- Normal Mode: The standard
virtual_vram_gbslider continues to let you select one donor device (like your system's RAM) to offload to. The more virtual VRAM you add, the more of the model is pushed to the donor device. Simple and effective. - Expert Mode: For connoisseurs of performance, with two Expert Modes
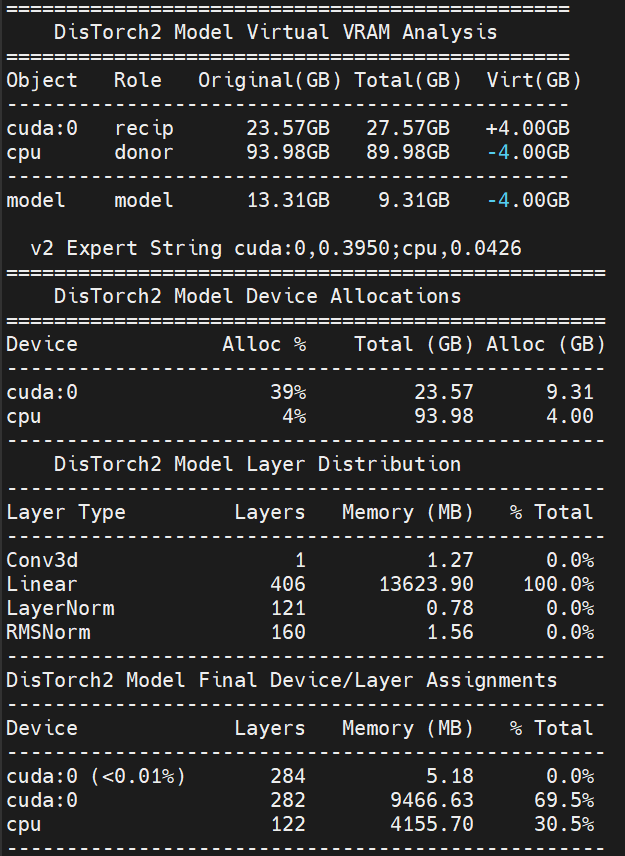
byteandratiothat allow you to specify exactly how the model itself is split across all your available devices as well as the legacyfractionmethod for your devices to have exact allocations. These modes are all accomplished via a single, flexible text string:- Bytes (Recommended): The most direct way to slice up your model. Inspired by Huggingface's
device_map, you can specify the exact number of gigabytes or megabytes for each device. The wildcard*assigns the remainder of the model to a device, making it easy to offload. (The CPU acts as the default wildcard if none are specified.)- Example:
cuda:0,2.5gb;cpu,*will load the first 2.50GB of the model ontocuda:0and the rest onto thecpu. - Example:
cuda:0,500mb;cuda:1,3.0g;cpu,5gb*will put 0.50GB oncuda:0, 3.00GB oncuda:1, and 5.00GB (or the remainder) oncpu.
- Example:
- Ratio: Love the simplicity of
llama.cpp'stensor_split? This mode is for you. Specify a ratio to distribute the model across devices.- Example:
cuda:0,25%;cpu,75%will split the model in a 1:3 ratio, loading 25% ontocuda:0and 75% onto thecpu. - Example:
cuda:0,8%;cuda:1,8%;cpu,4%uses an 8:8:4 ratio, putting 40% of the model oncuda:0, 40% oncuda:1, and 20% oncpu.
- Example:
- Fraction: The original DisTorch expert mode. This mode splits the model based on the fraction of each device's total VRAM to be used.
- Example:
cuda:0,0.1;cpu,0.5will use 10% ofcuda:0's VRAM and 50% of thecpu's RAM to hold the model. - Example:
cuda:0,0.0207;cuda:1,0.1273;cpu,0.0808will use 2.1% ofcuda:0's VRAM, 12.7% ofcuda:1's VRAM, and 8.1% of thecpu's RAM to hold the model.
- Example:
- Bytes (Recommended): The most direct way to slice up your model. Inspired by Huggingface's
- Normal Mode: The standard
- Free up GPU VRAM instantly without complex settings
- Run larger models by offloading layers to other system RAM
- Use all your main GPU's VRAM for actual
compute/ latent processing, or fill it up just enough to suit your needs and the remaining with quick-access model blocks. - Seamlessly distribute .safetensors and GGUF layers across multiple GPUs if available
- Allows you to easily shift from on-device speed to open-device latent space capability with a simple one-number change

DisTorch Nodes with one simple number to tune its Vitual VRAM to your needs
Works with all .safetensors and GGUF-quantized models.
⚙️ Expert users: Like .gguf or exl2/3 LLM loaders, use the expert_mode_alloaction for exact allocations of model shards on as many devices as your setup has!
The new Virtual VRAM even lets you offload ALL of the model and still run compute on your CUDA device!
Installation via ComfyUI-Manager is preferred. Simply search for ComfyUI-MultiGPU in the list of nodes and follow installation instructions.
Clone this repository inside ComfyUI/custom_nodes/.
The extension automatically creates MultiGPU versions of loader nodes. Each MultiGPU node has the same functionality as its original counterpart but adds a device parameter that allows you to specify the GPU to use.
Currently supported nodes (automatically detected if available):
- Standard ComfyUI model loaders:
- CheckpointLoaderAdvancedMultiGPU / CheckpointLoaderAdvancedDisTorch2MultiGPU
- CheckpointLoaderSimpleMultiGPU / CheckpointLoaderSimpleDisTorch2MultiGPU
- UNETLoaderMultiGPU / UNETLoaderDisTorch2MultiGPU
- UNetLoaderLP
- VAELoaderMultiGPU / VAELoaderDisTorch2MultiGPU
- CLIPLoaderMultiGPU / CLIPLoaderDisTorch2MultiGPU
- DualCLIPLoaderMultiGPU / DualCLIPLoaderDisTorch2MultiGPU
- TripleCLIPLoaderMultiGPU / TripleCLIPLoaderDisTorch2MultiGPU
- QuadrupleCLIPLoaderMultiGPU / QuadrupleCLIPLoaderDisTorch2MultiGPU
- CLIPVisionLoaderMultiGPU / CLIPVisionLoaderDisTorch2MultiGPU
- ControlNetLoaderMultiGPU / ControlNetLoaderDisTorch2MultiGPU
- DiffusersLoaderMultiGPU / DiffusersLoaderDisTorch2MultiGPU
- DiffControlNetLoaderMultiGPU / DiffControlNetLoaderDisTorch2MultiGPU
- WanVideoWrapper (requires ComfyUI-WanVideoWrapper):
- WanVideoModelLoaderMultiGPU
- WanVideoVAELoaderMultiGPU
- WanVideoTinyVAELoaderMultiGPU
- WanVideoBlockSwapMultiGPU
- WanVideoImageToVideoEncodeMultiGPU
- WanVideoEncodeMultiGPU
- WanVideoDecodeMultiGPU
- WanVideoSamplerMultiGPU
- WanVideoVACEEncodeMultiGPU
- WanVideoClipVisionEncodeMultiGPU
- WanVideoControlnetLoaderMultiGPU
- WanVideoUni3C_ControlnetLoaderMultiGPU
- WanVideoTextEncodeMultiGPU
- WanVideoTextEncodeCachedMultiGPU
- WanVideoTextEncodeSingleMultiGPU
- LoadWanVideoT5TextEncoderMultiGPU
- LoadWanVideoClipTextEncoderMultiGPU
- FantasyTalkingModelLoaderMultiGPU
- Wav2VecModelLoaderMultiGPU / DownloadAndLoadWav2VecModelMultiGPU
- GGUF loaders (requires ComfyUI-GGUF):
- UNet family: UnetLoaderGGUFMultiGPU / UnetLoaderGGUFDisTorch2MultiGPU
- UNet Advanced bundles: UnetLoaderGGUFAdvancedMultiGPU / UnetLoaderGGUFAdvancedDisTorch2MultiGPU
- CLIP family: CLIPLoaderGGUFMultiGPU / CLIPLoaderGGUFDisTorch2MultiGPU
- Dual CLIP: DualCLIPLoaderGGUFMultiGPU / DualCLIPLoaderGGUFDisTorch2MultiGPU
- Triple CLIP: TripleCLIPLoaderGGUFMultiGPU / TripleCLIPLoaderGGUFDisTorch2MultiGPU
- Quadruple CLIP: QuadrupleCLIPLoaderGGUFMultiGPU / QuadrupleCLIPLoaderGGUFDisTorch2MultiGPU
- XLabAI FLUX ControlNet (requires x-flux-comfy):
- Florence2 (requires ComfyUI-Florence2):
- LTX Video Custom Checkpoint Loader (requires ComfyUI-LTXVideo):
- NF4 Checkpoint Format Loader (requires ComfyUI_bitsandbytes_NF4):
- MMAudio (requires ComfyUI-MMAudio):
- Pulid (requires PuLID_ComfyUI):
All MultiGPU nodes available for your install can be found in the "multigpu" category in the node menu.
Detailed technical documentation is available for all automatically-detected core MultiGPU and DisTorch2 nodes, covering 70+ documented nodes with comprehensive parameter details, output specifications, and DisTorch2 allocation guidance where applicable.
- To access documentation: Click on any core MultiGPU or DisTorch2 node in ComfyUI and select "Help" (question mark inside a circle) from the resultant menu
- Coverage: All standard ComfyUI loader nodes (UNet, VAE, Checkpoints, CLIP, ControlNet, Diffusers) plus popular GGUF loader variants
- Contents: Input parameters with data types and descriptions, output specifications, usage examples, and DisTorch2 distributed loading explanations with allocation modes and strategies
- Note: Documentation covers core ComfyUI-MultiGPU functionality only. Third-party custom node integrations (WanVideoWrapper, Florence2, etc.) have their own separate documentation.
All workflows have been tested on a 2x 3090 + 1060ti linux setup, a 4070 win 11 setup, and a 3090/1070ti linux setup.


WanVideoWrapper T2V
|

WanVideoWrapper 1.3B Control LoRA
|

WanVideoWrapper 2.2 I2V A14B GGUF
|

FLUX UNet + Dual CLIP + VAE Loaders (MultiGPU)
|

SD15 CheckpointLoaderSimple (MultiGPU)
|

SDXL CheckpointLoaderAdvanced (MultiGPU)
|

FLUX UNet + Dual CLIP GGUF
|

Qwen Image UNet DisTorch2 GGUF
|

HunyuanVideoWrapper DisTorch (Legacy, Deprecated)
|

Florence2 Detailed Caption to FLUX Pipeline
|
If you encounter problems, please open an issue. Attach the workflow if possible.
Currently maintained by pollockjj. Originally created by Alexander Dzhoganov. With deepest thanks to City96.